Now Reading: How to Connect an Interactive Whiteboard to a Laptop
-
01
How to Connect an Interactive Whiteboard to a Laptop
Connecting an interactive whiteboard to a laptop typically requires a video cable for display and a USB connection for touch functionality, along with proper software installation and calibration. Once connected, your laptop screen mirrors to the board and allows you to control content using touch or pen input, making presentations and lessons fully interactive.
Interactive whiteboards have become essential tools in classrooms, training rooms, and corporate environments because they enhance collaboration and engagement. Whether you are a teacher, presenter, or business professional, knowing how to connect your laptop correctly ensures smooth operation and full access to the board’s interactive features. This comprehensive guide explains the most reliable connection methods, covers both Windows and Mac devices, and offers practical troubleshooting advice to help you achieve optimal performance.
Understanding How Interactive Whiteboards Communicate with Laptops
An interactive whiteboard does not function as a standalone computer in most cases. Instead, it acts as both a display and an input device for your laptop. The video signal from your laptop determines what appears on the board, while a separate data connection enables touch or pen interaction. This dual communication is why most setups require at least two cables or a properly configured wireless system.
When the video signal is active, your laptop treats the whiteboard as an external monitor. This allows you to mirror your screen or extend your desktop, depending on your preference. The USB or wireless data connection tells your laptop where you are touching the board, allowing you to write, draw, and control applications directly from the surface.
Related search: Best Interactive Whiteboards for Home Use with Budget Options
Understanding this relationship between display and input helps clarify why connecting only a video cable will show your screen but will not enable touch. Both connections must be present and properly configured for full functionality.
Wired Connection as the Most Reliable Method
A wired connection is the most common and dependable way to connect an interactive whiteboard to a laptop. This method uses a video cable to transmit the image and a USB cable to transmit touch data. It is widely supported across different brands and operating systems.
Begin by connecting an HDMI cable from your laptop to the corresponding port on the interactive whiteboard. If your laptop or board does not have HDMI, VGA or DisplayPort may be used instead. Once the video cable is connected, attach a USB cable from the whiteboard to your laptop. This second cable is essential for enabling interactive features.
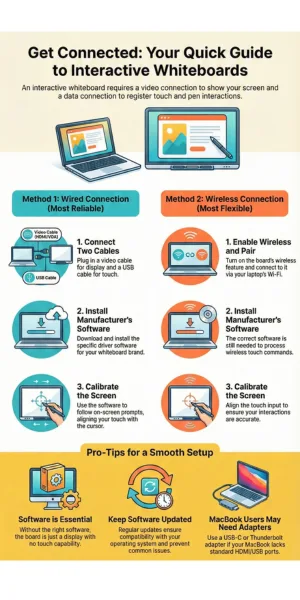
Guide to Interactive Whiteboard Setup Infographic
After both cables are in place, turn on the whiteboard and your laptop. Most systems will automatically detect the display and configure basic settings. You should see your laptop screen appear on the board. If not, adjust your display settings to mirror or extend the screen.
Also read: Laptop Brands Preferred by Professional Graphic Designers
Next, install the manufacturer’s whiteboard software on your laptop. For example, SMART Boards typically require SMART Notebook or related drivers. This software allows the system to recognize touch input and provides calibration tools.
Once installed, open the software and follow the on screen prompts to calibrate the board. Calibration ensures that the point you touch on the board matches the cursor location on screen. After calibration, you should be able to control your laptop directly from the whiteboard using your finger or a pen.
This wired method is ideal for permanent classroom installations and situations where stability and consistent performance are critical.
Wireless Connection for Flexible Setup
Some interactive whiteboards support wireless connectivity, allowing you to connect your laptop without physical cables. This option is convenient for mobile presenters and shared spaces, but it depends on both devices supporting compatible wireless technology.
To begin, enable the wireless feature on the whiteboard. This is usually done through a settings menu or a dedicated wireless button. Once enabled, the board will broadcast a signal or display connection instructions.
On your laptop, open your Wi Fi or Bluetooth settings and search for available devices. Select the interactive whiteboard from the list and follow any pairing instructions. You may be asked to enter a passcode displayed on the board.
Also read: Best Smart Refrigerators with Wi-Fi Connectivity for Home Use
After the wireless connection is established, install the required whiteboard software on your laptop if it is not already present. This software ensures that touch input and annotation tools function correctly.
Finally, complete the calibration process using the software. Once calibrated, your laptop screen should appear on the board, and touch input should work as expected.
Wireless connections offer flexibility and reduce cable clutter, but they may be slightly less stable than wired connections. A strong network signal is essential for smooth performance.
Connecting a MacBook to an Interactive Whiteboard
MacBooks often use USB C or Thunderbolt ports, which may require different cables or adapters. Many modern interactive whiteboards support USB C connections that combine video and data in a single cable.
Connect a USB C cable from your MacBook to the whiteboard. In many classroom environments, this cable is already available at the podium or connection panel. Once connected, your MacBook should automatically detect the external display.
If a dialog box called Keyboard Setup Assistant appears, you can close it. This prompt is not required for whiteboard operation.
If touch functionality does not work immediately, unplug and reconnect the USB C cable or try a different port on your MacBook. Some Mac systems also require additional touch drivers from the whiteboard manufacturer. Installing these drivers usually resolves compatibility issues.
After installation, calibrate the board using the manufacturer’s software. Once completed, you should be able to interact with your MacBook directly from the whiteboard.
Installing and Updating Whiteboard Software
Whiteboard software plays a critical role in enabling full interactivity. Without the correct drivers and applications, the board may display your screen but not respond to touch.
Download the latest software version from the manufacturer’s official website. This ensures compatibility with your operating system and provides access to the newest features and security updates.
After installation, restart your laptop to ensure all components load correctly. Open the software and verify that the board is recognized. Most applications include a status indicator that confirms connection.
Regularly updating the software helps maintain stability and prevents issues caused by operating system updates. Keeping both your laptop and whiteboard software current is a best practice for long term reliability.
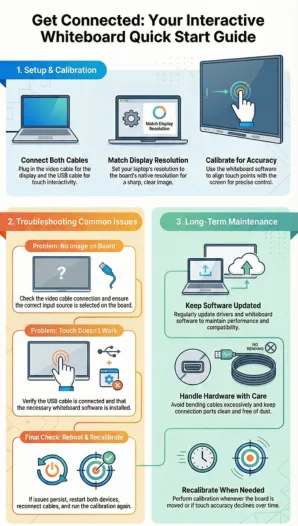
Interactive Whiteboard Quick Start Guide Infographic
Calibrating the Interactive Whiteboard for Accuracy
Calibration aligns the physical touch points on the board with the digital image displayed. Without proper calibration, the cursor may appear offset from where you touch, making precise interaction difficult.
To calibrate, open the whiteboard software and select the calibration or alignment option. You will be prompted to touch specific targets displayed on the screen. Follow the instructions carefully and touch each point accurately.
Once calibration is complete, test the board by tapping icons and writing in different areas. If alignment still feels off, repeat the calibration process.
Calibration should be performed whenever the board is moved, when display resolution changes, or when touch accuracy declines.
Optimizing Display Settings for Best Image Quality
Interactive whiteboards are designed to operate at specific resolutions, commonly 1080p or 4K. Matching your laptop’s display resolution to the board’s native resolution ensures sharp images and clear text.
Open your laptop’s display settings and select the recommended resolution for the whiteboard. Choose mirror mode if you want the same image on both your laptop and the board. Choose extend mode if you prefer using the board as a second screen.
Adjust brightness and contrast if necessary to improve visibility in well lit rooms. Proper display configuration enhances readability and overall user experience.
Troubleshooting Common Connection Problems
If your laptop screen does not appear on the board, first check the video cable connection and ensure the correct input source is selected on the whiteboard. If the screen appears but touch does not work, verify that the USB cable is connected and that the whiteboard software is installed. Restart both devices and try again.
Also read: What Makes a Laptop Best for Graphic Design Work
If problems persist, disconnect and reconnect all cables, then recalibrate the board. Testing with a different cable can also help identify hardware issues. For ongoing issues, consult the manufacturer’s support resources or contact their technical support team. They can provide device specific guidance and firmware updates if needed.
Using Interactive Whiteboards Effectively After Connection
Once connected, you can use the whiteboard to annotate documents, browse the web, run presentations, and collaborate in real time. Many whiteboard applications include tools for drawing, highlighting, saving notes, and sharing content.
Familiarizing yourself with these features maximizes the value of your setup. Practice using gesture controls, pen tools, and screen capture functions to streamline your workflow. Proper training and regular use help users become comfortable and confident with interactive technology.
Ensuring Long Term Reliability and Performance
To maintain consistent performance, handle cables carefully and avoid bending or pulling them excessively. Keep ports clean and free of dust. Update software and drivers regularly, and recalibrate the board periodically. Store styluses properly and replace worn tips when necessary. These simple maintenance steps extend the lifespan of your equipment and reduce downtime.
Final Thoughts
Connecting an interactive whiteboard to a laptop is a straightforward process when you understand the need for both video and data connections, proper software installation, and calibration. Whether using a wired or wireless setup, following the correct steps ensures reliable performance and full interactivity. With the right configuration and regular maintenance, your interactive whiteboard becomes a powerful tool for collaboration, teaching, and presentation.
Frequently Asked Questions
Do I need both HDMI and USB to use an interactive whiteboard?
Yes, HDMI or another video cable sends the display signal, while USB enables touch and pen input.
Can I connect an interactive whiteboard wirelessly?
Yes, if both the board and laptop support wireless connectivity and the required software is installed.
Why does my screen show but touch does not work?
This usually means the USB cable is not connected or the whiteboard drivers are not installed.
Do MacBooks require special drivers?
Some models do, depending on the whiteboard brand. Installing manufacturer drivers typically resolves issues.
How often should I calibrate the board?
Calibrate whenever accuracy decreases, the board is moved, or display settings change.
What resolution should I use?
Use the whiteboard’s native resolution, commonly 1080p or 4K, for best image quality.
Can I use any USB cable?
Most standard USB A to B or USB C cables work, but high quality cables provide better reliability.
What should I do if nothing works?
Restart devices, check cables, reinstall software, and contact the manufacturer’s support team.
Also read: Top 5 Laptops for Graphic Design Professionals

Dony Garvasis is the founder of Search Ethics, a freelance SEO consultant, and a passionate technology blogger. With over 8 years of experience in SEO, blogging and content marketing, I provide expert content on Tech, digital marketing, SEO, Artificial intelligence, gadgets, science, automobiles, lifestyle, tips, tutorials and much more. My mission is simple: Ethical Search, Genuine Results! I will make sure people everywhere get trustworthy and helpful information.